Floor Flatness Surveying and Testing
An industrial concrete floor needs to have an appropriate flatness in order to provide a suitable surface for the operation of materials handling equipment (MHE), and an appropriate levelness to ensure that the building as a whole, with all its static equipment and MHE can function satisfactorily.
By analysing floor flatness — such as: F-Numbers (Ff and Fl) in accordance with ASTM E 1155 or Property F of the UK TR34 — organisations can identify surface irregularities that might restrict the safe and smooth operation of MHE across the warehouse floor.
Flatness and Levelness
 The difference between flatness and levelness is illustrated in Figure 3.1.
Kevin Dare, Managing Director of Face Consultants Ltd and a member of the Concrete Society’s Technical Report 34 working group on floor surface regularity puts forward some important views on producing the best floor surfaces.
“Floor flatness has a significant impact on the efficiency, performance and safety of materials handling equipment especially fork lift trucks. The Concrete Society’s Technical Report (TR34) first published in 1988 and now on its 4th edition was a pioneering step and indeed today contains the principal standards used to determine floor flatness in warehouses.”
Floor Surveys
In warehouses, MHE operates in two distinct areas of traffic movement, these are Defined Movement and Free Movement. Face Consultants offer floor surveys and floor testing services for both areas.
We also offer floor surveys and testing for Goods to Person Robotics (G2P) including Autonomous Mobile Robot (AMR) and Automated Storage and Retrieval Systems (ASRS) floor testing.
Defined Movement Area

Floors in very narrow aisle racking systems are used by materials handling equipment that run on defined movement floors in fixed pathways between the racking.
The concrete floors are measured with Face Profileographs of slightly differing configurations.
A high standard of floor flatness is an essential requirement for the safe and efficient operation of a narrow aisle forklift truck.
Free Movement Area

Free Movement Surveys are carried out on warehouse floors and other industrial facilities, in any area where MHE traffic is free to move randomly in any direction such as transfer aisles or block stacking and wide aisle areas.
When assessing surface regularity in FM areas it is not possible to survey an infinite number of traffic paths, therefore a representative sample of the floor is surveyed on a 3-metre grid.
Why Flatness is important
Meeting the required surface regularity tolerance, is essential for the following reasons:
- Operations are more efficient if lift trucks operate at maximum speed.
- Poor surface regularity will cause excessive vibration on a lift truck and increase downtime and maintenance.
- Health & Safety and reduced driver fatigue
- Reduced damage to stock.
- Gives control over the general quality of a floor when constructed.
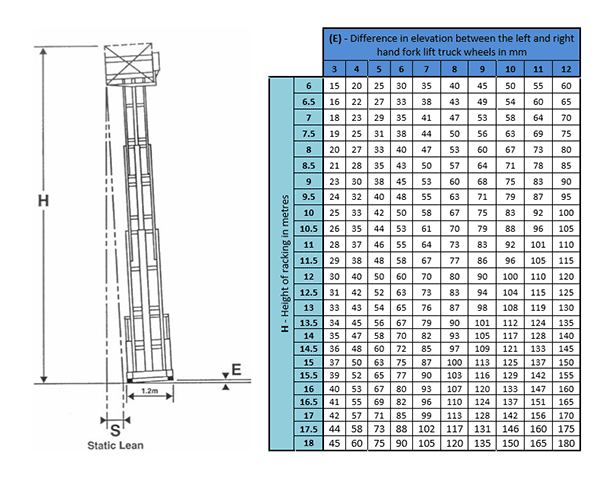
Undoubtedly the most important category of industry where floor surface regularity tolerances are essential is within aisles of high-density warehouses where defined path, very narrow aisles (VNA) trucks operate.
The static lean table shows how the potential for truck lean is increased by the lifting height.
Digital Floor Flatness Testing
Face Consultants use the latest in digital floor flatness testing equipment to check both Defined and Free Movement floors to either TR34, DIN, EN 15620:2008*, or the American F-Number system.
Diverse Flooring Applications
Face Consultants has extensive experience across a wide range of sectors and have conducted floor surveys and testing in multiple environments including:
- TV Studios
- Leisure Centres
- Data Centres
- Railway Centre Platforms
- Football Stadiums
- Velodromes
- Warehouses
We are committed to meeting the unique demands of various industries.
Free Movement Floor Flatness Testing Equipment
Why we no longer test with the Face Dipstick®
The Face Dipstick floor profiler, launched in 1982 by The Face® Companies, was developed to measure the difference in elevation between two points 300mm apart.
The Face Dipstick could be ‘walked’ across a section of the floor between the two sequential points. The data was then collated, and calculations made. This was used to check Ff and Fl numbers in accordance with the American F-Number System and also Property II now known as Property F from the UK TR34.
This is now considered a long slow process as we now use The Face F-Speed Reader to check Ff and Fl numbers and the Face Property II Meter to check Property F of TR34 as this is a much faster data gathering process (see below).
F-Speed Reader

The F-Speed Reader tests floor surface for compliance to ASTM E 1155, generating F-Numbers (FF and FL) with accuracy and speed. It can also compliance test floor flatness to TR34 FM (Free Movement) specifications Property II (3rd edition), or Property F (4th edition).
When the F-Speed Reader is run along the floor data is immediately collected and sent to your handheld android device, ready to be transferred to a PC or laptop. Data is then analysed by CoGri Report Studio, either on-site or emailed back to the office.
Face Property II Meter

Property F (Flatness) is now commonly measured using a rolling instrument such as the Face Property II Meter, which collates data at a continuous rate in change of slope over a 600mm distance. Precision is guaranteed by the sub-millimetre accuracy of the laser-based sensor.
Using an Engineers precise level, fitted with a Parallel Plate Micrometer and taking readings from an Invar staff, the elevation differences on a three-metre grid are checked. This is known as Property E. The same equipment is also used to check departure from Datum.
DINmeter Profiler

Free Movement floors can also be measured according to section 5 of the German DIN 18202 (General Building Specification). Finished floors are detailed within table 3 of the section, and the deviation limits for variable gauge lengths are defined.
Our DINmeter Profiler provides a continuous differential profile of the floor at the centre point from a mean line generated by two points 1 metre apart. Our laser-based sensors again provide sub-millimetre accuracy. The data is analysed at the touch of a button and the percentage error per survey line calculated. Graphs are then produced for 1, 2 and 4 metre gauge lengths.
Defined Movement Floor Flatness Testing Equipment
Unlike Free Movement floors, when measuring the flatness of Defined Movement floors, it is essential that the height of the racking used in the Very Narrow Aisle (VNA) warehouses and facilities are taken into consideration.
Face Floor Profileograph

The Face Floor Profileograph was designed to replicate the wheel configuration and movement of Materials Handling Equipment (MHE), unlike other testing standards which used straight edge measurements.
CoGri Engineering are the designers and manufacturers of the Face Profileograph, used to measure a single F-Number (“F-min”) as set by the American Concrete Institute, ACI 360R-10, “Guide to Design of Slabs-On-Ground”. The F-min number is used to define the worst acceptable flatness and levelness conditions in a VNA aisle, with the F-min value assigned according to the expected lift truck and rack height.
Categories of flatness are also shown in the Concrete Society’s Technical Report 34 (TR34) 4th edition 2016 (Table 3.2). DM2 is for rack heights between 8 and 13 metres and DM3 for racking heights less than 8 metres. Racks where the top beam exceeds 13m require DM1 floors.
The Face profileograph measures to the Concrete Society’s TR34 (4th edition) requirements, recording the transverse difference in elevation to all defined traffic classifications. The longitudinal control also looks at the elevation difference of the front to rear axle of the forklift truck, therefore, seeing the floor profile as the truck would feel it.
The German DIN 15185 and VDMA guidelines can also be checked.
Finally, the Face Profileograph measures to EN 15620:2008*, section 6.
EN 15620:2008* defines the flatness requirements for very narrow aisle floors, describes how to achieve them, and states the allowable values of the properties of flatness and how to measure them.
This is achieved by taking continuous calculation both transversely and longitudinally, using the profileographs’ tilt sensors.
Book a Floor Survey
We provide free advice on all concrete floor tolerances. Or you can book a floor survey today from our team of world-leading engineers.


