EN 15620:2008
The flatness classification that Face Consultants recommend outside the UK for other European countries, is that contained within EN 15620:2008†, in which section 6 discusses flatness requirements for very narrow aisle (Class 300) warehouse floors, how to achieve them, the allowable values of the properties of flatness and how to measure them.
Table 5 – Classification and limiting values of ZSLOPE and ESD
| Classification | Top beam level m | ZSLOPE mm per m | ESD mm |
|---|---|---|---|
| DM 1 | Over 13 | 1,3 | 3,25 |
| DM 2 | 8 to 13 | 2,0 | 3,25 |
| DM 3 | Up to 8 | 2,5 | 3,25 |
Table 6a – Limiting values of dZ and d2Z
| Classification | dZ | d2Z |
|---|---|---|
| Calculation | Z x ZSLOPE | dZ x 0,75 |
| DM 1 | Z x 1,3 | Z x 1,0 |
| DM 2 | Z x 2,0 | Z x 1,5 |
| DM 3 | Z x 2,5 | Z x 1,9 |
Table 6b – Limiting values of dX and d2X
| Classification | dX | d2 |
|---|---|---|
| Calculation | 2 x 1,1 x ZSLOPE | Fixed values |
| DM 1 | 2,9 | 1,5 |
| DM 2 | 4,4 | 2,0 |
| DM 3 | 5,5 | 2,5 |
Tables 5 6a and 6b detail the allowable values of the properties of flatness for differing categories.
N.B The values shown in table 6b are based on MHE with a longitudinal dimension of 2000mm, for other dimensions the designer may adjust the values on a linear extrapolation basis
It is not possible to specify and impose these limits for defined movement unless the exact design of the VNA installation is known before construction. The choice of classification to specify is dependent upon the height of the top beam of the racking.
However, the recommendations of the VNA fork lift truck manufacturer should also be sought, as each model is designed to cater for different requirements and is therefore affected differently by surface regularity.
Test Instruments:
It is recommended that a continuous method of measurement should be adopted in all cases of defined traffic movement.
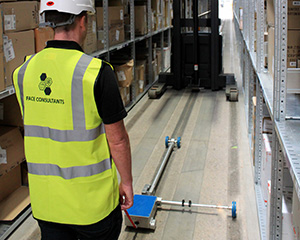
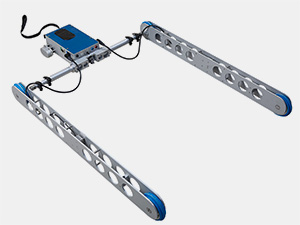
For continuous measurement the Face Profileograph is used. The Profileograph is a self propelled wheeled instrument which travels across the floor taking continuous measurements both Transversely and Longitudinally.
These readings are generated by the tilt sensors, which are set up to measure the Longitudinal and Transverse properties of the specification. These readings are collected on a data logger and subsequently downloaded to a PC where Face Consultants’ specialised software generates the graphic traces and compliance results.
The Profileograph is set up to measure values dZ dX along with d²Z and d²X of the EN 15620:2008† standard.
This is achieved by running the Profileograph along the aisle in the wheel tracks of the VNA forklift truck. Each wheel of the Profileograph runs along the centre line of one of the MHE wheel tracks – one for the left, one for the right and two for the rear wheels (configurable for MHE with three or four wheels and to any MHE vehicle footprint) – simultaneously measuring all four properties of the specification in a single operation.
Tables 5 6a and 6b detail the allowable values of the properties of flatness for differing categories.
Related Documents
- Click Here To Download Table 5, 6a and 6b
- Click Here To Download EN 15620:2008† Further Explanatory Information
The Face Profileograph

The Face Profileograph was originally developed to check the floor’s surface regularity against the American F-min number system for defined traffic floors.
Checking Compliance

Checking for compliance with a Face Profileograph.
Measurement Standards

EN 15620
(2008)†
TR34 3rd Ed Chapter 4
The Concrete Society’s TR34 Free Movement (3rd Ed) Chapter 4
(Previous Version)*
† Replaced 2021. New version has no flatness requirement.


